|
|
| Line 48: |
Line 48: |
| | ==The Bridge== | | ==The Bridge== |
| | The Bridge is where the Red and Blue sides of the map meet. Defenders usually don't set up here, so attackers are free to fly by and shoot each other. This area leads to the Streets. | | The Bridge is where the Red and Blue sides of the map meet. Defenders usually don't set up here, so attackers are free to fly by and shoot each other. This area leads to the Streets. |
| | + | |
| | + | For defenders, daring Snipers can use the upper bridge for taking shots at enemies, then quickly retreating into the Building before they get killed. Bored Demomen can place Pipe Traps under the bridge, but smart attackers will fly over The Bridge with [[concjump]]s and similar moves once they see the trap. |
| | {{Image_Gallery | | {{Image_Gallery |
| | | igimage1=[[Image:Ff_epicenter0071.gif|135px]] | | | igimage1=[[Image:Ff_epicenter0071.gif|135px]] |
Revision as of 12:44, 4 March 2008
Locations
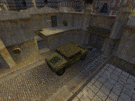
Spawn Room
The spawn room contains three backpacks, a grenade backpack and the flag. Each backpack contains little armor and health, so at the start of a round, an Engineer should repair each teammate's armour before the round starts. The flag and grenades shold be reserved for fast classes, such as the Scout and Medic. This room leads to the Balcony and Streets.
|
|

|
| Overview of the Spawn Room.
|
|
|
|
|
|
x Balcony
The Balcony is a small strip of land that connects the Spawn Room, Street and Building together.
Sneaky attackers can get to the Cap Point by using the Balcony to bypass the Street and go to the part of the Building that connects to the Cap Point. However, they should be aware of people coming out of the Spawn Room. It only takes one person noticing the attacker to set off the entire defense.
Defenders shouldn't worry about protecting this area. Most attackers don't use it, and the ones that do risk being caught by a teammate coming out of Spawn. If a defender notices that enemies are using it to access the Cap Point, they should set set up a temporary Sentry Gun or a HWGuy until the attackers get scared off.
|
|
|
| .
|
|
|
|
|
|
Building
The Building is a large, destroyed building that can be used in a variety of ways. It connects and leads to the Street, Cap Point and The Bridge.
Attackers can use the Building as a shortcut to the Cap Area. An entrance to the Building can be seen on the right side of the lower Bridge. The entrance leads to the top of the Building, which can then be used to run to the Cap Area or snipe defenders. Attackers wanting to get a jump on the Sentries in the Cap Area can go downstairs via the exit near The Bridge, take a right once they're down, run near the enemy's Spawn Room and take potshots at Sentries from a safe distance.
Defenders can use it as a Sniper's nest. It has multiple holes that point in the direction of the enemy's side of the Streets. Daring Snipers can run near the entrance to The Bridge and snipe from there. Defenders can also set up sentries to pre-emptivly take out attackers before they get to the Cap Area. A well-placed Sentry can do wonders against attackers not expecting it. The Balcony connects to it, making it easy for defenders to get over to it in a matter of seconds.
x Streets
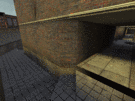
The Bridge
The Bridge is where the Red and Blue sides of the map meet. Defenders usually don't set up here, so attackers are free to fly by and shoot each other. This area leads to the Streets.
For defenders, daring Snipers can use the upper bridge for taking shots at enemies, then quickly retreating into the Building before they get killed. Bored Demomen can place Pipe Traps under the bridge, but smart attackers will fly over The Bridge with concjumps and similar moves once they see the trap.
|
|

|
| .
|
|
|
|
|
|
| .
|
|
|
|
|
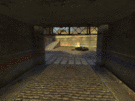
Cap Area
The Cap Area is where the enemy team deposits their flag for a capture. It's tight design makes it easy for attackers to get caught in Pipe Traps and Sentry Gun.
Attackers should be very careful when approaching this area. This area is a prime location for Sentry Guns. Soldiers, Scouts and Medics should have their anti-SG weapons (Rocket Launcher, Nailgun and Super Nailgun) out when they approach this area. Defending Demomen like to lay Pipe Traps in the area, so defenders should try to bait them to that they detonate early. Atacking Demomen can shoot Blue or Pipe Grenades around corners to catch defenders off-guard. Snipers can be used to gravely injure or outright destroy sentires; one fully charged shot can destroy level 1 and 2 Sentries, while a level 3 Sentry will be on the verge of death.
Defenders should focus on this area; it's tightness makes it difficult for attackers to get back alive. Engineers should place Sentry Guns near or flanking the Cap Point and tend to them 24/7; attackers usually have their anti-SG weapons out when they approach this area. Demomen should place Pipe Traps and hide. HWGuys should place themselves behind the jeep, but to the side of the actual cap point, so that can take out enemies if the manage to slip by the initial defense. Remember to have Engineers repair armour between waves.
|
|
|
| Oberview of the Cap Area. The raised floors near the jeep are great for sentry placement.
|
|
|
|
|

|
| .
|
|
|
|
|


