The WIP page is below this.
 |
This is a stub map page and needs proper content. In the meantime the map loading screen is being displayed as a placeholder. |
Description
CZ2 takes place in a futuristic arena, where Red and Blue are competing to take control of Capture Points for glory, fame, money, women, and cats. In order to capture a point, you must bring a flag to the point. Beware; carrying a flag will reduce your speed by 1/2. Unlike other Capture Point maps, you can see what team controls what point simply by looking at the beams shooting to the sky. Red beams mean Red controls a point and blue beams mean Blue controls a point.
Succeding in this map takes a precise mixture of attackers and defenders. If there are too many attackers, they'll get slaughtered by the enemy's defense when they try to capture points that're near the enemy's base. If there's too much defense, they won't be able to capture any points outside of the ones that're near their base. Even with all that defense, few slippery enemy attackers can get the points they're defending, allowing them to win a round.
Locations
Base
This is where your respawn and Control Center are. You'll appear in the respawn room, which has four bags and a defense turret.
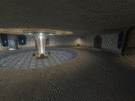
Just past the respawn room is the resupply room. It has four ammo backpacks surrounding a large glass pillar with electricity in it. On the walls are two grenade backpacks, each containing two grenades. The two doors near the ammo backpacks lead to Outside the Base, along with the gas fan between the two doors.
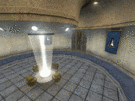
Inside the Control Center are three flags in the back, and lights indicating what team has what points on the left and right walls. If a Detpack is placed here, your captured points will reset and the enemy will get 15 points.
Attackers should send a Demoman in here if the enemy has a lot of points and the flag runners might not get to the points in time. The reset will turn the tides towards the attacker's team.
Defenders should have a HWGuy in here if one of your teammates spots a Demoman running around. The HWGuy's armour can absorb a lot of Blue Grenades, and a MIRV. In addition, the Minigun makes short work of the Demoman. Some persistant attackers might have a Spy come in and try to backstab the HWGuy, so he should be careful.
|
|
|
| The main supply room.
|
|
|
|
|
|
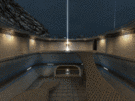
| Respawn.
|
|
|
|
|

|
| The Control Center. Don't let a Demoman get in here!
|
|
|
|
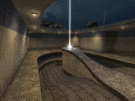
Outside Base
|
|

|
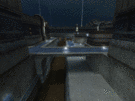
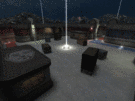
| Overview of the paths leading from Base. The left one leads to CP2/4 and CP3 and the right one leads to CP1/5.
|
|
|
|
|
|
| Closeup of the left path. You can see how the right path leads to CP1/5.
|
|
|
|
|
|
| Closeup of the right path. You can see how the left path connects to CP2/4 and CP3.
|
|
|
|
|

|
| The gas machine will propel you up to the top of the nearby building..
|
|
|
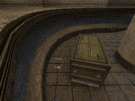
Capture Points 1 and 5
Capture Point 1 (and 5) is the closest point to a team's base. It can be accessed from the hall that leads from the leftmost door in the Base and across from CP3. Near the back left wall is are two medikits. Once the point is captured, Blue Armour, a backpack filled with ammo and two medikits will appear next to the medikits. The "moat" that surrounds the CP has two medikits behind a box.
Attackers should try to get CP 1 if they're on blue or 5 if they're on Red first. It's the closest point and is frequently the last point to be captured by the enemy. Once the point closest to them is captured, they should have one attacker focus on capturing the opposite point (5 for Blue, 1 for Red). This usually freaks out the enemy team long enough so that ally attackers can capture a hotly-contested point and set up a basic defense.
Defenders should have a HWGuy or Soldier in this area. Once the closest point to the base is captured, attackers like to slip through and capture this point point while the defender's team try to capture other points. A burst from the Minigun or Rocket Launcher can take out your average attacker before he touches the point and disappears. If the point is captured, the defender should ask an attacker to take a flag over to the point before things get worse.
|
|
|
| Overview of Control Point 1/5.
|
|
|
|
|
|
| There's a cache of medikits behind the box on the lower floor.
|
|
|
|
|
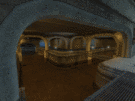
Capture Points 2 and 4
|
|
|
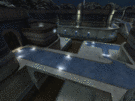
| The area just outside Capture Point 2/4. The sewer leads to the enemy's CP 2/4, the ramp leads to CP3 and the entrance on the right leads to CP2/4.
|
|
|
|
|
|
| Overview of CP2/4. Notice the medikit behind the box.
|
|
|
|
|
|
| The cubbyhole on the bottom floor has a cache of three medikits.
|
|
|
|
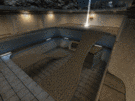
Capture Point 3
Capture Point 3 is the most hotly-contested point in CZ2, as it's in the center of the map. CP 2/4 links to this area from two ways (from the hall that's to the right of the actual CP and the slope that goes past the regular entrance to CP 2/4) CP 1/5 from one (the entrance that's away from the team's base is almost directly connected to CP3. The huts on each side have two medikits, and a Blue Armour and a backpack filled with ammo will appear once the point is captured.
Attackers should have "heavy" escort, such as a HWGuy and a Soldier. Things get really hectic in this point, and bodyguards will do wonders while trying to get to the point. Even though the ceiling is low, a concjump can make a big difference getting past the chaos.
Defenders will find it difficult to set up a long-term defense here. Because of the constant waves of attacker and their bodyguards, getting a Sentry up will be quite difficult. To divert the enemy offense long enough to set up a barebones defense, an ally attacker should capture a point on their side. This will make the enemy focus more on that point (as it's closer to their base), causing less attackers to come by. Backpacks and Blue Armour in the huts make it relativly easy for Engineers to set up a Sentry when there's a lull in the fighting.
Once defenders have set up shop, they should have at least one defender guarding every entrance. A sentry should be on top of one of the hut's corners that face the entrance from CP1/5, allowing it to cover the windows from the enemy's CP 2/4 , the entrance from CP 1/5 and the actual arena. HWguys, Soldiers, Pyros and Demomen should be placed in the Sentry's blind spots (such as the ramp that comes from CP 2/4 and the defender's team windows) or in areas that the sentry covers (as reinforcement). Defenders need to be quick on their toes, as attacker can get to the point quickly if they're a fast class like a Scout or Medic.
|
|
|
| Overview of Capture Point 3. The huts will have a Blue Armor and backpack appear when somebody captures the CP.
|
|
|
|
|

|
| The entrance to CP3 from CP2/4.
|
|
|
|
|


