|
|
| Line 34: |
Line 34: |
| | | | |
| | ==Top of the Ramp== | | ==Top of the Ramp== |
| | + | The Top of the Ramp is the primary chokepoint for the defenders because it's the only easly-avaiable path to the Flag Room, is somewhat small and has a resupply room. This room leads to the Flag Room from both paths, but use different ways of doing so. The one parallel to the Resupply room splits to the sides, then connects at the entrance to the Flag Room, while the one perpendicular to the Resupply room has an elevator that leads to the top of the Flag Room. |
| | + | |
| | + | Attackers should bypass this area and enter the Flag Room via the Plank. There's usually a large cluster consisting of Sentries, HWGuys, Soldiers and/or Demomen here, making it all but impossible to get past this room without getting lucky or having a competent Spy successfully sabotage the Sentries. If an attacker wants to go through here, he needs to be very fast. Even one minor mistake can cost him his life. Once the defense starts becoming stretched, they'll focus less on this area, making it quite possible to get out of here alive. |
| | + | |
| | + | Defenders should place two Sentries here. The slope makes it almost impossible for attackers to attack the Sentries without them being noticed, and they'll rarely get up to the top without dying a lot. However, if attackers catch on, they'll start using the Plank to get to the Flag Room, so defenders shouldn't be surpised if they see that their flag has been stolen without them seeing the perpretrator. |
| | {{Image_Gallery | | {{Image_Gallery |
| | | igimage1=[[Image:ff_shutdown20010.jpg|135px]] | | | igimage1=[[Image:ff_shutdown20010.jpg|135px]] |
The WIP page is below this.
 |
This is a stub map page and needs proper content. In the meantime the map loading screen is being displayed as a placeholder. |
Description
Shutdown2 takes place in a large pit in a hilly area. Red and Blue have rewired the power generator from a nearby town to power laser fields protecting their flags.
The key twist in this map is that there are lasers blocking the entrance to the Flag Room. If you touch the lasers, you will explode. To disable them, you must find and disable the power generator located nearby. Once it's down, you have a minute to grab the flag and get it out of the flag room. This encourages teammates to work together (for once!).
Locations
Respawn
This is where you'll respawn. There are two ammo backpacks side-by-side and an isolated grenade backpack in each respawn room.
|
|

|
| Respawn Room 1, in the Top of the Ramp.
|
|
|
|
|
|
|
| Respawn Room 2, in the lower Ramp Room.
|
|
|
|
|
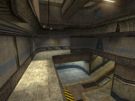
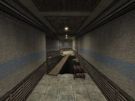
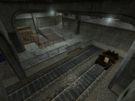
Ramp Room
|
|
|
| Overview of the Ramp Room.
|
|
|
|
|
|
| The Upper Ramp Room.
|
|
|
|
|
|
| The resupply/respawn room on the right side of the lower Ramp Room.
|
|
|
|
Ramp
|
|

|
| The arena.
|
|
|
|
|
|
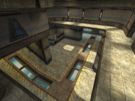
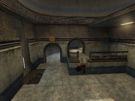
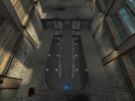
Top of the Ramp
The Top of the Ramp is the primary chokepoint for the defenders because it's the only easly-avaiable path to the Flag Room, is somewhat small and has a resupply room. This room leads to the Flag Room from both paths, but use different ways of doing so. The one parallel to the Resupply room splits to the sides, then connects at the entrance to the Flag Room, while the one perpendicular to the Resupply room has an elevator that leads to the top of the Flag Room.
Attackers should bypass this area and enter the Flag Room via the Plank. There's usually a large cluster consisting of Sentries, HWGuys, Soldiers and/or Demomen here, making it all but impossible to get past this room without getting lucky or having a competent Spy successfully sabotage the Sentries. If an attacker wants to go through here, he needs to be very fast. Even one minor mistake can cost him his life. Once the defense starts becoming stretched, they'll focus less on this area, making it quite possible to get out of here alive.
Defenders should place two Sentries here. The slope makes it almost impossible for attackers to attack the Sentries without them being noticed, and they'll rarely get up to the top without dying a lot. However, if attackers catch on, they'll start using the Plank to get to the Flag Room, so defenders shouldn't be surpised if they see that their flag has been stolen without them seeing the perpretrator.
|
|
|
|
| Overview of the Top of the Ramp.
|
|
|
|
|
|
Security
The security hosts the switch that controls the laser beams in the Flag Room. It can be accessed from two entracnes in the Ramp Room.
Attackers should try to touch the switch. They shouldn't bother trying to attack anybody in there; they just need to touch the switch. Disabling secuirty will tell your fellow attackers that they can now strike the Flag Room. Sneaky attckers can go inside once the lasers are down and flip the switch one the beams turn back on. The best time to do this is when the "10 seconds remain" notification appears on-screen. Going in before that will drain your attacking squad of an attacker.
Defenders should have a Sentry, and a HWGuy or Soldier in this room. THey should be placed in one of the corners, so that they can catch attackers off guard. If an attacker touches the switch, every defensive unit should relocate to the Flag Room ASAP; enemies won't bother with this room while the lasers are down.
However, if the laser beams will come online within 10 seconds or less, a sneaky attacker might run in and wait until the security is up again, and then touch the switch immedietly afterward the laser beams turn back on. Sending a defender in to clear out Security once the "10 seconds left" notification appears is the best way to prevent this from happening.
|
|
|
| This switch, when touched, will deactivate the lasers for 60 seconds.
|
|
|
|
|
|
| The entrances to the generator room.
|
|
|
|
|
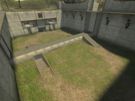
Battlements
The Battlements is where most of the Sniping occurs. Between the two sniping spots is the Cap Point for flag holders. Next to the Cap Point is a ladder that leads to the upper Yard.
Attackers can slip in through the upper Yard. Since Snipers probably won't be expecing an attacker to come through, it'll be easy to take one out. However, if a Sniper is killed, he and his buddies will be much more alert and might notice another attacker if he comes down.
Defenders can use this spot as a good sniping nest. Snipers can pick off anybody coming from the enemy's front door or the upper Yard with ease. Other classes shouldn't worry about defending this location; a Sniper Rifle shot followed by a burst from the Auto Rifle (when they get close) will take out most attackers with ease.
|
|
|
| The Capture Point is hidden between the two sniper posts.
|
|
|
|
|
|
Plank
The Plank connects the upper Ramp Room with the Flag Room. This is a very useful shortcut for attacker,s but they should be careful, as falling into the pit will kill you instantly.
Attackers can use this to bypass the Ramp and the local defense. Most defenders don't expect attackers to come into the flag room through ths way, so it's usually pretty quiet. This should be especially be used if there's a lot of defense in the Top of the Ramp.
Defenders can place a HWGuy here. If there's a large amount of resistance, attackers will go into the Flag Room via the Plank. A HWGuy placed just past the plank itself can make quick work of anybody trying to come through. Dastardly defenders can try to knock attackers into the pit.
|
|
|
| Don't fall down!
|
|
|
|
|
|
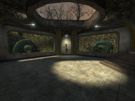
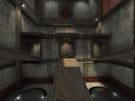
Flag Room
|
|
|
| Overview of the Flag Room.
|
|
|
|
|
|
| Shot of the flagroom from the roof.
|
|
|
|
|

|
| Shot from the top of the flag room.
|
|
|
|
|

|
| What happens when you try to run through the lasers.
|
|
|
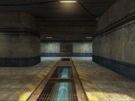
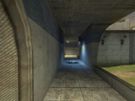
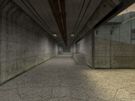
Train Tunnel
The Train Tunnel is a long underground passage that connects the Red and Blue bases. The start of each path has four medikits in the area where the boxes are, in addition to a small ralicart for those that need to get to the enemy base quickly. The medikits are very useful for attackers and defenders. The actual railway doesn't have a lot to offer, but can be conced by with ease.
Attackers should use this path to get to the enemy's base if there's too much enemy traffic and/or Snipers in the Yard. This is also an ideal passage for Spies to use, as very little people travel through here in the first place.
Defenders should have someone periodicially check in and see if there are any incoming enemies. If there are, he should inform his teammates then attack the enemies and hoard as many medikits as he can. The less an enemy can heal up the less chance he has to survive inside the base.
|
|
|
| Behind the boxes is a cache of medikits.
|
|
|
|
|

|
| People usually don't go this way, so it's usually empty.
|
|
|
|
|
Yard
The Yard is the primary passage between the two bases. The lower Yard is a grassy...yard...with the Bunker in it's middle. The upper Yard is a steel catwalk that's above the lower Yard and also connects the two bases. Both areas are dominated by Snipers.
Atttackers should use this area as the main road to the enemy's base. To avoid Snipers, using a special jumping skill just past the front door should give an attacker enough speed to bypass the Sniper's wrath. The upper Yard can also be used to get to the enemy's base, and it is usually more effective, as many defenders don't expect attackers to use the upper Yard to get into the enemy's base. If a Demoman and/or Soldier are using the upper Yard to get to the enemy's base and are near the Battlements, they can rain down rockets and grenades to take out off-guard Snipers.
Defenders should have their Snipers cover this area via the Battlements and the upper Yard. The upper Yard doesn't have any cover from enemy Snipers, but most attackers and Snipers alike don't expect anyone to use it as a sniping spot. Once the element of surprise is gone, Snipers should retreat to the Battlements and snipe from there.
Other defenders should focus their defense inside the base and let the Snipers handle the Yard.
|
|
|
| Overview of the yard. Notice the pathway that's near the top of it.
|
|
|
|
|

|
| The base.
|
|
|
|
|
Bunker
The Bunker is in the middle of the Yard. The left and right sides have ladders leading to the upper Yard. This place is always dead.
Attackers can head down here if they're caught by a Sniper while trying to head to the enemy's Battlements.
Defenders shouldn't even bother with this area. Nobody except attackers hiding for a brief moment come down here.
|
|
|
| The inner bunker. Not a lot goes on here.
|
|
|
|
|
|


