Difference between revisions of "Map:ff dustbowl/cp2 area1"
m (Yet another placeholder page) |
(Article written/new image template/remove old navbox) |
||
| (One intermediate revision by the same user not shown) | |||
| Line 1: | Line 1: | ||
| − | {{ | + | =Command Point Two, Attackers Spawn Exit= |
| + | <center> | ||
| + | {{Image | ||
| + | |image = [[Image:Ff_dustbowl_cp2_area1.jpg]] | ||
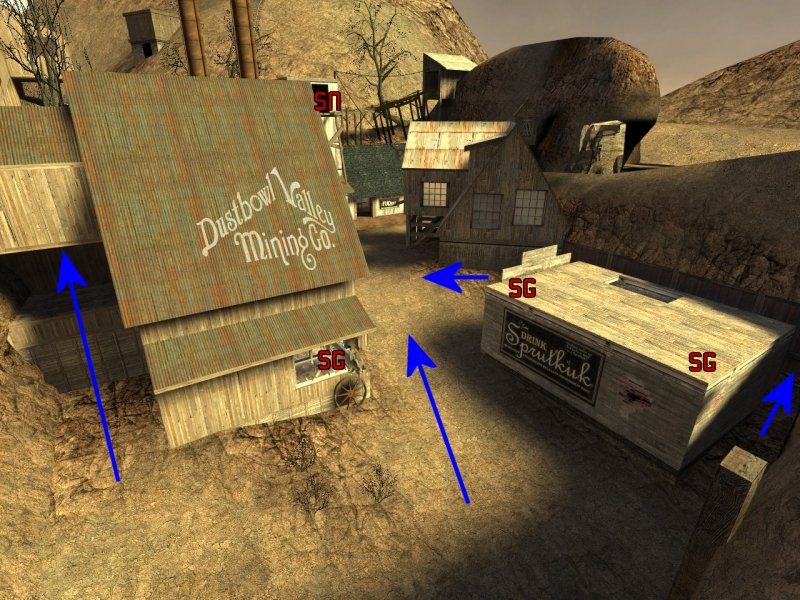
| + | |caption = '''View from the Attackers Spawn, Command Point 2'''<br> Defensive SG positions (Red '''SG''') are shown, as well as a useful Sniper position (Red '''SN'''), and the routes the attackers may find useful (Blue '''Arrows''') | ||
| + | }} | ||
| + | </center><br> | ||
| + | {{Guide Navbox/Mapguide|Dustbowl Valley|../cp2_area1_spawn|../cp2_area1_choke}} | ||
| − | = | + | ==Defenders== |
| − | + | Shown in this picture is another route that the Attacking team might take, in comparison to the last picture. The route is the one to the right side of the pciture, behind the building. This route is useful for Spies to sneak around, and up to the top of that building to take out Sentry guns, so it is always useful to keep an eye on it. | |
| − | |||
| − | + | Another thing of note is the Sniper position, high up and to the back of the picture (it is also where the previous picture was taken from). It provides a good view of much of the area, as well as some protection from enemy fire, but is aukward to get to for a lone Sniper. A Grenade jump can make it, but you'll likely need to practice the jump before being able to do so reliably. | |
| − | + | '''Note:''' The leftmost Sentry Gun position currently is not very useful in Fortress Forever v1.11. It has been included in this picture as it should be made usable in the upcoming v2.0 patch. | |
==Attackers== | ==Attackers== | ||
| − | + | Offensivly, once you get out from your spawn, the routes you can take should vary. The leftmost arrow shows a good route for Soldiers, and possibly Demomen, to sneak up behind some defenses and cause some real damage. The rightmost route is most useful to Spies, who can use it to sneak around the back of Sentry Guns placed on the nearby building - but it is also useful for other weaker classes such as Scouts, who can use it to avoid the fire they would come under if using the main route. Heavier and slower classes are often best taking the main route itself, as it is more direct - and they will likely do a better job of pushing the defence back so that the area is secured. | |
| − | |||
{{Navigation Map Guides}} | {{Navigation Map Guides}} | ||
| − | |||
Latest revision as of 04:57, 3 February 2008
Command Point Two, Attackers Spawn Exit
|
| Dustbowl Valley Mapguide | ||
|---|---|---|
| [[../cp2_area1_spawn|←]] | [[../|Main Article]] | [[../cp2_area1_choke|→]] |
Defenders
Shown in this picture is another route that the Attacking team might take, in comparison to the last picture. The route is the one to the right side of the pciture, behind the building. This route is useful for Spies to sneak around, and up to the top of that building to take out Sentry guns, so it is always useful to keep an eye on it.
Another thing of note is the Sniper position, high up and to the back of the picture (it is also where the previous picture was taken from). It provides a good view of much of the area, as well as some protection from enemy fire, but is aukward to get to for a lone Sniper. A Grenade jump can make it, but you'll likely need to practice the jump before being able to do so reliably.
Note: The leftmost Sentry Gun position currently is not very useful in Fortress Forever v1.11. It has been included in this picture as it should be made usable in the upcoming v2.0 patch.
Attackers
Offensivly, once you get out from your spawn, the routes you can take should vary. The leftmost arrow shows a good route for Soldiers, and possibly Demomen, to sneak up behind some defenses and cause some real damage. The rightmost route is most useful to Spies, who can use it to sneak around the back of Sentry Guns placed on the nearby building - but it is also useful for other weaker classes such as Scouts, who can use it to avoid the fire they would come under if using the main route. Heavier and slower classes are often best taking the main route itself, as it is more direct - and they will likely do a better job of pushing the defence back so that the area is secured.
|
